Table of contents
- Creating Contact Links
- Creating Collapsible Content
- Utilizing Semantic Elements
- Grouping Form Elements
- Enhancing Dropdown Menus
- Improving Video Presentation
- Supporting Multiple Selections
- Display Text as Subscript and Superscript
- Creating Download Links
- Defining Base URL for Relative Links
- Control Image Loading
- Managing Translation Features
- Setting Maximum Input Length
- Setting Minimum Input Length
- Enabling Content Editing
- Controlling Spell Checking
- Ensuring Accessibility
- Defining Target Behavior for Links
- Providing Additional Information
- Accepting Specific File Types
- Optimizing Video Loading
In this post, I’ll share 21 HTML Tips with code snippets that can boost your coding skills.
Let’s jump right into it.🚀
Creating Contact Links
Create clickable email, phone call, and SMS links using HTML:
<!-- Email link -->
<a href="mailto:name@example.com"> Send Email </a>

<!-- Phone call link -->
<a href="tel:+1234567890"> Call Us </a>

<!-- SMS link -->
<a href="sms:+1234567890"> Send SMS </a>
Creating Collapsible Content
You can use the <details> and <summary> tags, when you want to include collapsible content on your web page.
The <details> tag creates a container for hidden content, while the <summary> tag provides a clickable label to toggle the visibility of that content.
<details>
  <summary>Click to expand</summary>
  <p>This content can be expanded or collapsed.</p>
</details>
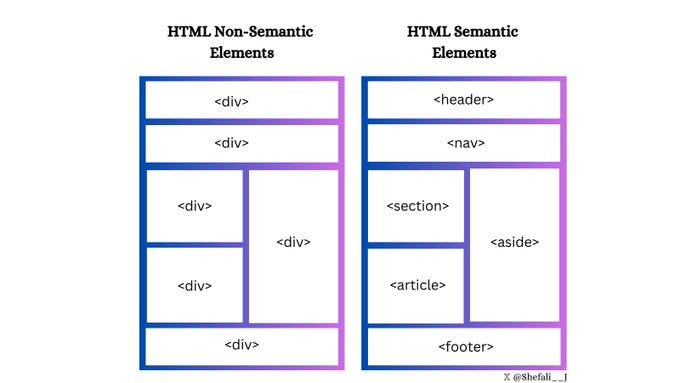
Utilizing Semantic Elements
Choose semantic elements over non-semantic elements for your websites. They make your code meaningful and improve structure, accessibility, and SEO.

Grouping Form Elements
Use the <fieldset> tag to group related elements in a form and the <legend> tag with <fieldset> to define a title for the <fieldset> tag.
This is useful for creating more efficient and accessible forms.
<form>
   <fieldset>
      <legend>Personal details</legend>
      <label for="firstname">First name:</label>
      <input type="text" id="firstname" name="firstname" />
      <label for="email">Email:</label>
      <input type="email" id="email" name="email" />
      <label for="contact">Contact:</label>
      <input type="text" id="contact" name="contact" />
      <input type="button" value="Submit" />
   </fieldset>
</form>
Enhancing Dropdown Menus
You can use the <optgroup> tag to group related options in a <select> HTML tag.
This can be used when you are working with large dropdown menus or a long list of options.
<select>
   <optgroup label="Fruits">
      <option>Apple</option>
      <option>Banana</option>
      <option>Mango</option>
   </optgroup>
   <optgroup label="Vegetables">
      <option>Tomato</option>
      <option>Broccoli</option>
      <option>Carrot</option>
   </optgroup>
</select>
Improving Video Presentation
The poster attribute can be used with the <video> element to display an image until the user plays the video.
<video controls poster="image.png" width="500">
  <source src="video.mp4" type="video/mp4 />
</video>
Supporting Multiple Selections
You can use the multiple attribute with the <input> and <select> elements to allow users to select/enter multiple values at once.
<input type="file" multiple />
<select multiple>
    <option value="java">Java</option>
    <option value="javascript">JavaScript</option>
    <option value="typescript">TypeScript</option>
    <option value="rust">Rust</option>
</select>
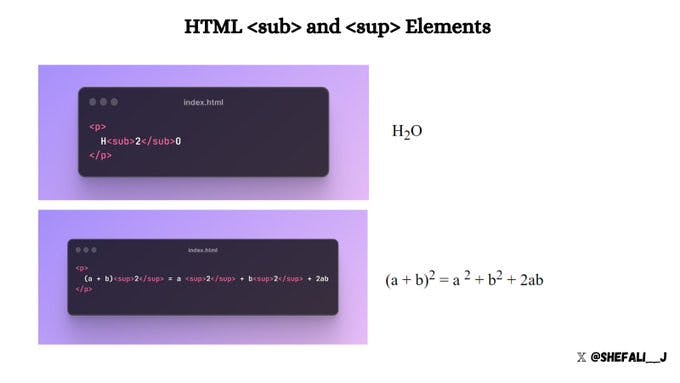
Display Text as Subscript and Superscript
The <sub> and <sup> elements can be used to display the text as subscript and superscript respectively.

Creating Download Links
You can use the download attribute with the <a> element to specify that when a user clicks the link, the linked resource should be downloaded rather than navigated to.
<a href="document.pdf" download="document.pdf"> Download PDF </a>
Defining Base URL for Relative Links
You can use the <base> tag to define the base URL for all relative URLs in a web page.
This is handy when you want to create a shared starting point for all relative URLs on a web page, making it easier to navigate and load resources.
<head>
   <base href="https://shefali.dev" target="_blank" />
</head>
<body>
   <a href="/blog">Blogs</a>
   <a href="/get-in-touch">Contact</a>
</body>
Control Image Loading
The loading attribute with the <img> element can be used to control how the browser loads the image. It has three values: "eager", "lazy", and "auto".
<img src="picture.jpg" loading="lazy">
Managing Translation Features
You can use the translate attribute to specify whether the content of an element should be translated by the browser's translation features.
<p translate="no">
  This text should not be translated.
</p>
Setting Maximum Input Length
By using the maxlength attribute, you can set the maximum number of characters entered by the user in an input field.
<input type="text" maxlength="4">
Setting Minimum Input Length
By using the minlength attribute, you can set the minimum number of characters entered by the user in an input field.
<input type="text" minlength="3">
Enabling Content Editing
Use the contenteditable attribute to specify whether the element’s content is editable or not.
It allows users to modify the content within the element.
<div contenteditable="true">
   You can edit this content.
</div>
Controlling Spell Checking
You can use the spellcheck attribute with <input> elements, content-editable elements, and <textarea> elements to enable or disable spell-checking by the browser.
<input type="text" spellcheck="true"/>
Ensuring Accessibility
The alt attribute specifies an alternate text for an image if the image cannot be displayed.
Always include descriptive alt attributes for images to improve accessibility and SEO.
<img src="picture.jpg" alt="Description for the image">
Defining Target Behavior for Links
You can use the target attribute to specify where a linked resource will be displayed when clicked.
<!-- Opens in the same frame -->
<a href="https://shefali.dev" target="_self">Open</a>

<!-- Opens in a new window or tab -->
<a href="https://shefali.dev" target="_blank">Open</a>

<!-- Opens in the parent frame -->
<a href="https://shefali.dev" target="_parent">Open</a>

<!-- Opens in the full body of the window -->
<a href="https://shefali.dev" target="_top">Open</a>

<!-- Opens in the named frame -->
<a href="https://shefali.dev" target="framename">Open</a>
Providing Additional Information
The title attribute can be used to provide additional information about an element when a user hovers over it.
<p title="World Health Organization">WHO</p>
Accepting Specific File Types
You can use the accept attribute to specify the types of files accepted by the server (only for file type). This is used with the <input> element.
<input type="file" accept="image/png, image/jpeg" />
Optimizing Video Loading
You can make video files load faster for smoother playback by using the preload attribute with <video> element.
<video src="video.mp4" preload="auto">
   Your browser does not support the video tag.
</video>
That’s all for today.
I hope it was helpful.
Thanks for reading.
For more content like this, click here.
You can also follow me on X(Twitter) to get daily tips on web development.
Keep Coding!!